
Setup and Take Down Manual
1 Setup & Take Down Lead
4-6 Setup & Take Down Assistants
All parents on the Setup and Take Down Crew must be able to lift heavy objects and to commit to coming early and/or staying late for home meets. The benefit is you get to sit back and watch the meets.
Wednesday Meets & Events:
Arrival: 4:00 PM
Departure: ~ 1:00 PM
Saturday Meets & Events:
Arrival: 7:00 AM
Departure: ~ 9:45 - 10:00 PM
Setup and take down are generally 1 hour each. Doing only setup or only take down accounts for ½ shift.
Because of the nuances involved in setup and take down, everyone on the setup and take down crew must commit to this position for the season. If you need to arrive late or leave early, make sure you have secured a replacement to do your job.
Setup
Quick Starter Sheet
Before the Meet
Parking Lot Signs
Set out parking posters first thing to secure spaces
Prepare the Pool
Take off Tarps (Short on top, Long on Bottom)
Install Lane Ropes (Special Tool)
Set Up Starting Blocks (Shallow & Deep End)
Secure Diving Board with Ratchet Straps
Put Up Backstroke Flags (Special Tool)
Announcer and Timer Areas
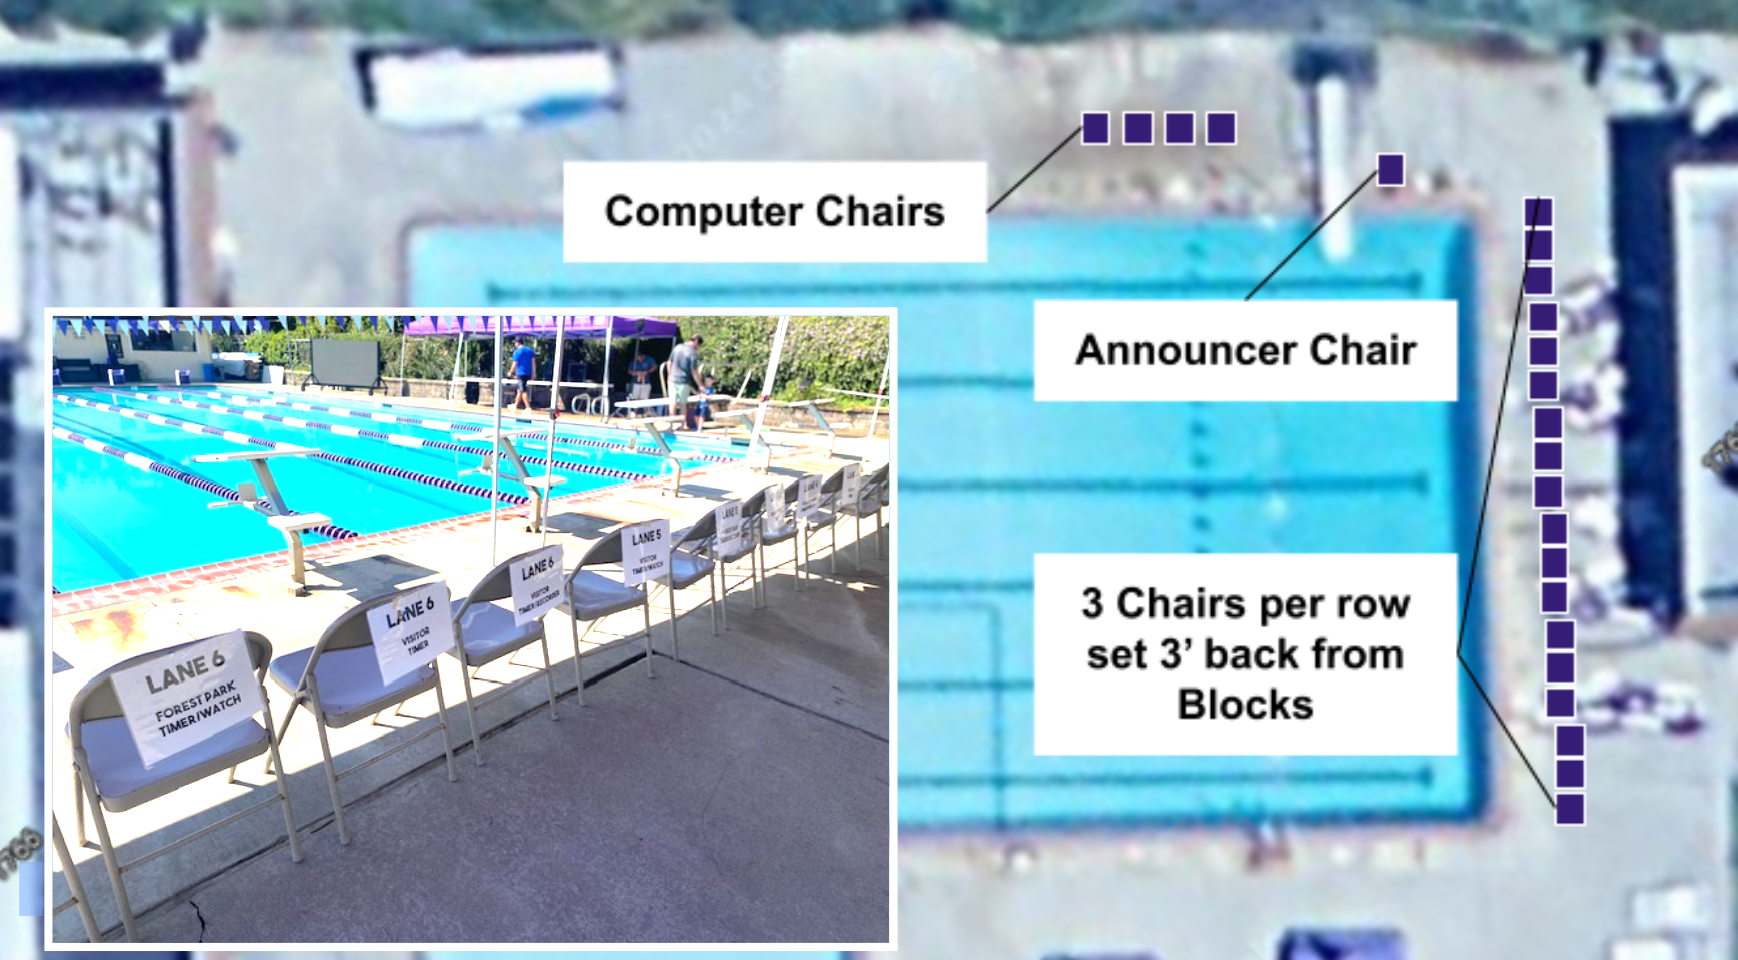
EZ Ups w/Buckets: 2 @ Computer Desk, 3 @ Timers
3 Computer Desk Tables & 4 Chairs
2 Starter Chairs
24 Timer Chairs (6 Computer Desk / 18 Timers)
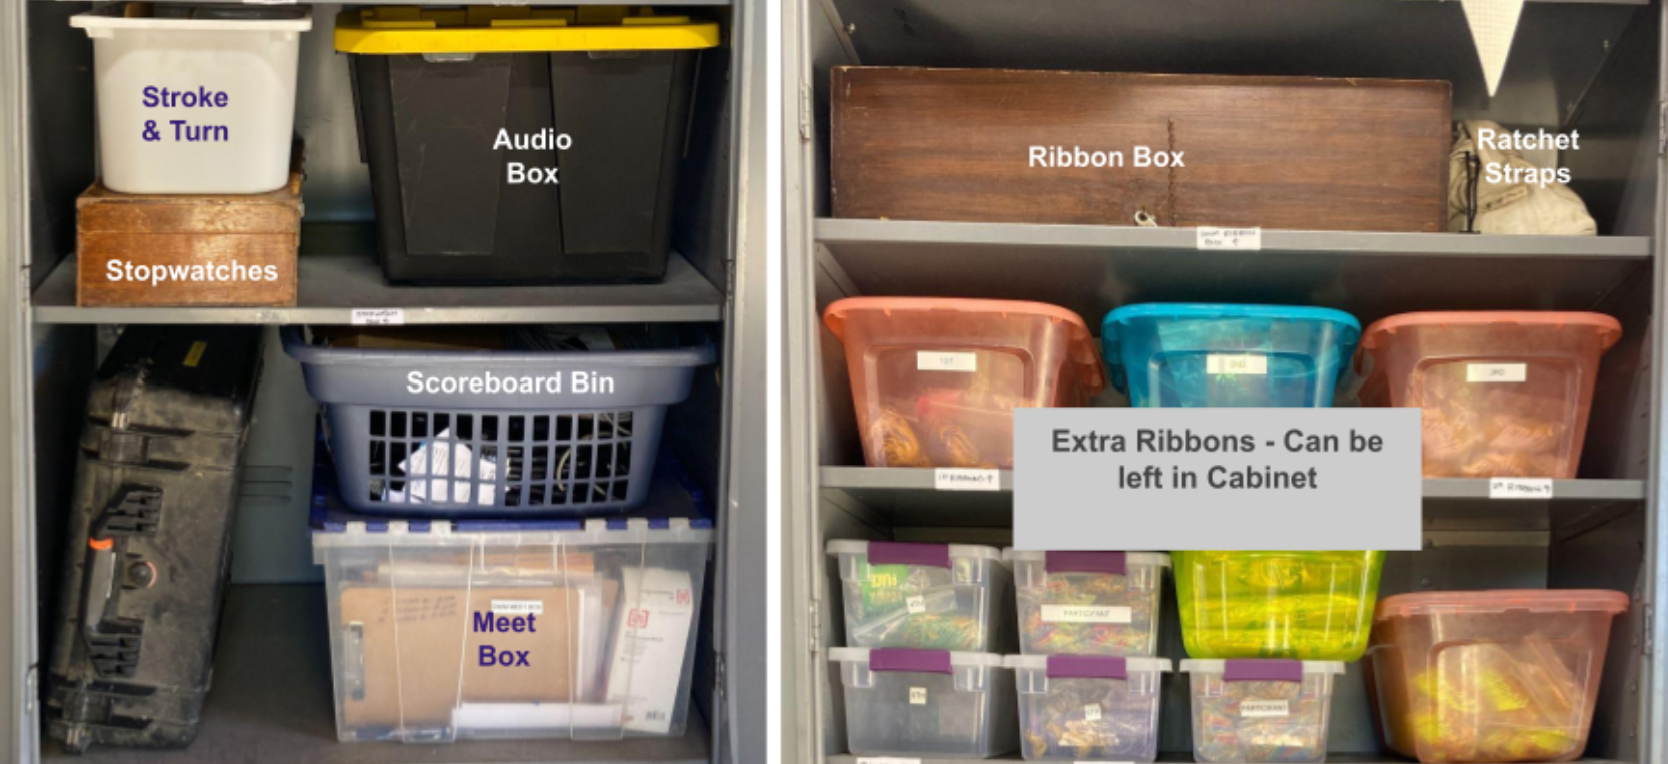
Computer Desk: Sun Shields, Monitors, Ribbon Box, Audio Equipment, Stroke & Turn Box, & Meet Box on Tables
Pull Out Scoreboard
Spectators & Sales Areas
Position Bleachers
Block off Stroke & Turn Lanes
Block off Parking Spaces
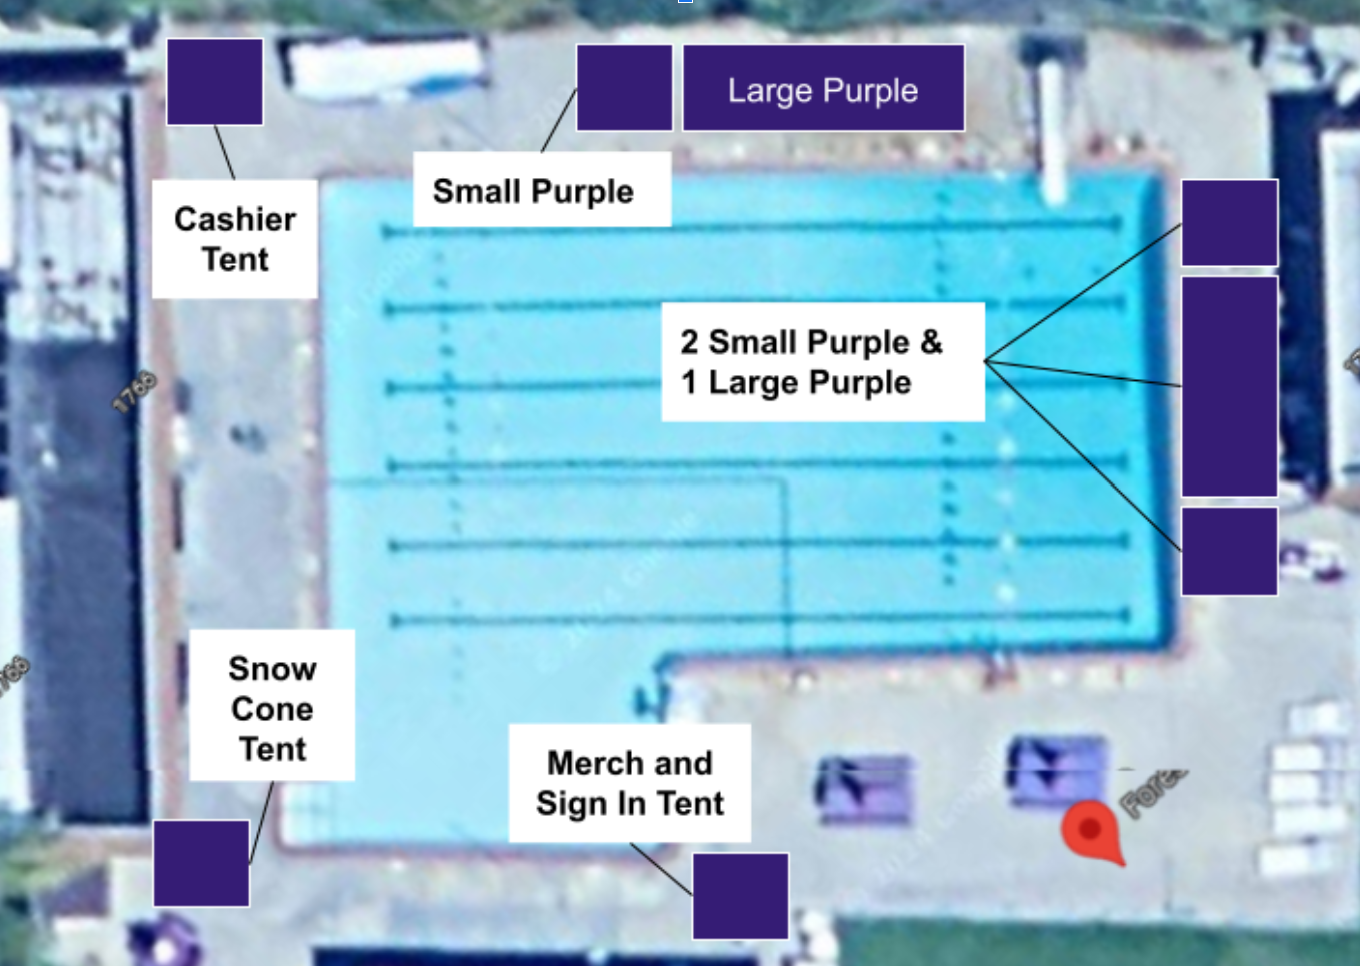
Setup Merch and Sales Tables
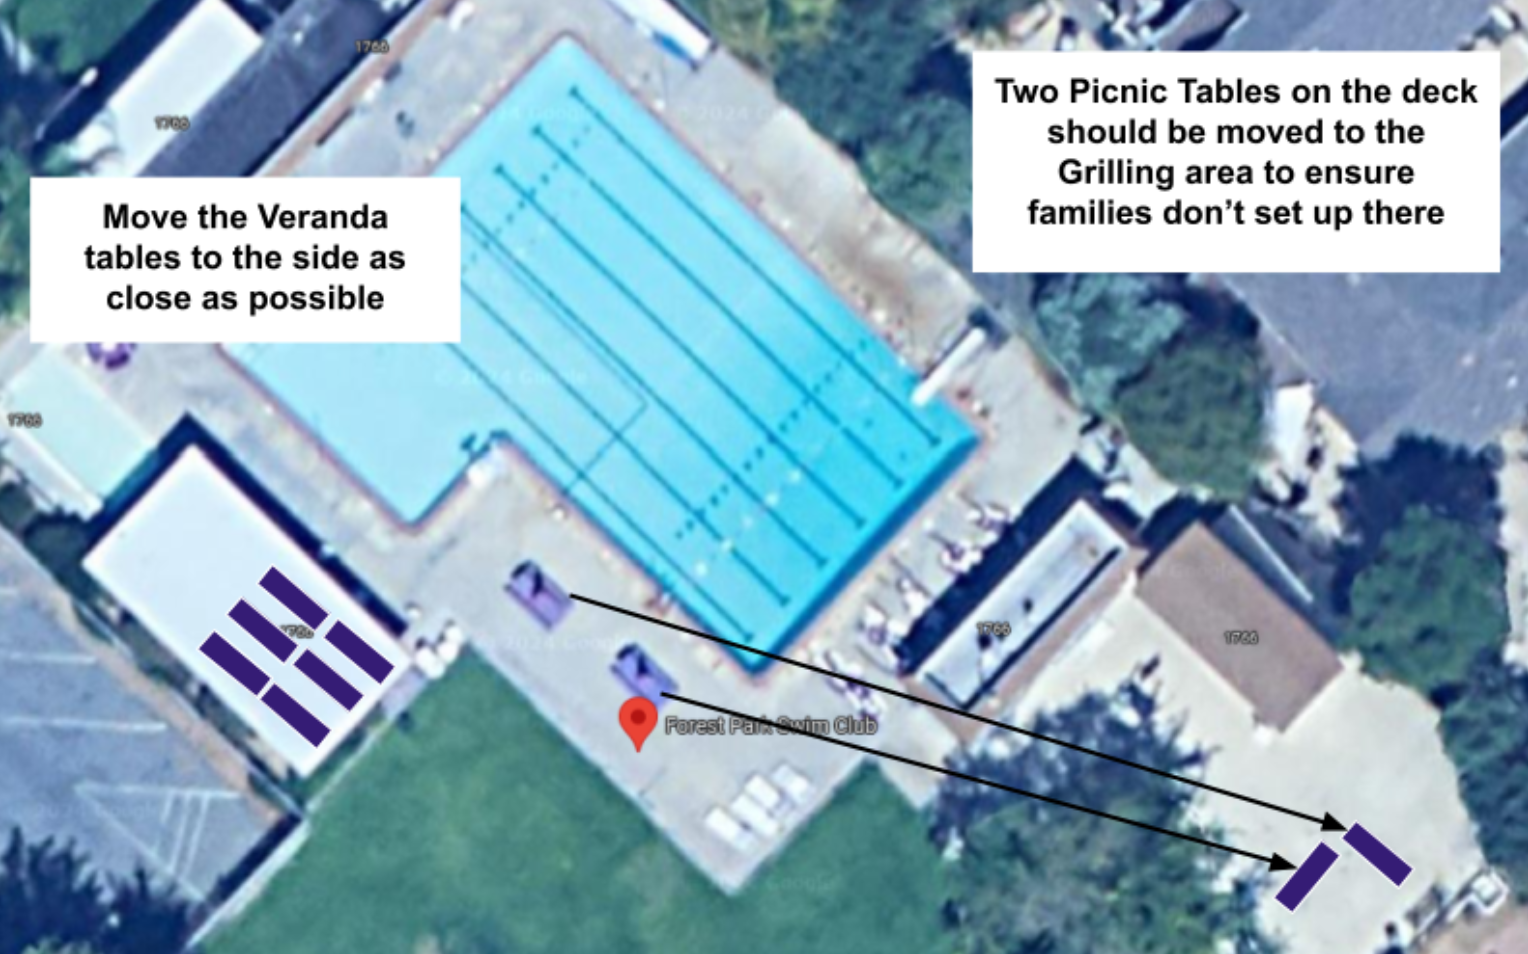
Move Front Tables to the Side
During Meet
Check & Replace garbage bags as needed.
Check Bathroom Supplies
Take Down
Lane Ropes onto Reel (Leave in pool on Wed. for AM Practice)
Remove Starting Blocks
Drop Diving Board
Remove Backstroke Flags
Put Away EZ Ups, Tables, Buckets, and Computer Desk Equipment
Chairs to Chair Racks
Roll Scoreboard behind Snack Shack
Store Bleachers behind Pool House (Secure with lock)
Remove Cones from Parking Spaces
Clean Bathrooms
Empty / Replace all garbage bags & recycle can/bottle bags as needed
Pick up trash & Lost /found items
Lock Back Shed, Snack Shack, & Swim Team Storage Area
Tarps on Pool
First Priority: Prepare the Pool
1. Install Lane Ropes
Instructions: Hooks on shallow end and ratchet on deep end. Use the ratchet tool, hung on the wall at the deep end, to tighten. Do not over tighten! Rope should sit just on top of the water in a straight line. Tighten just enough to make the rope straight.


2. Set up Starting Blocks at Both Ends
Instructions: Starting blocks for 9-10+ are stored in the back storage shed. The 8 and Under blocks (Purple) are stored in the lifeguard room next to the snack shack. All blocks have lane numbers on the block. Lane 1 is closest to the timing desk, Lane 6 is closest to the stands.To install deep end blocks, use small tool hanging on deep end wall to remove square caps. Wiggle and bounce the blocks until they are fully in place.

3. Prop and Secure the Diving Board
Storage Location: Ratchet straps are located in the Back Storage (2 sets)
Instructions: This is a two person job (minimum). Diving board is not removable, so it must be lifted and securely propped up with ratchet straps under and over the board (to prevent both dropping down towards swimmers and flying backwards with wind).
- Have one or two people lift and hold up the board at a 45 degree angle.
- Wedge the metal board bar under the diving board, rubber side up.
- Take the first ratchet strap and starting from the back left corner (near the stairs), wrap the strap around the metal bar 1 time, go under the diving board, and wrap again on the other side of the bar. Hook into the right corner.
- Connect the second ratchet strap to the front left corner. Wrap around the board and connect to the front right corner.
- Ratchet down the straps to make sure the board is secure. Make sure the hooks cannot slip out or slide around.


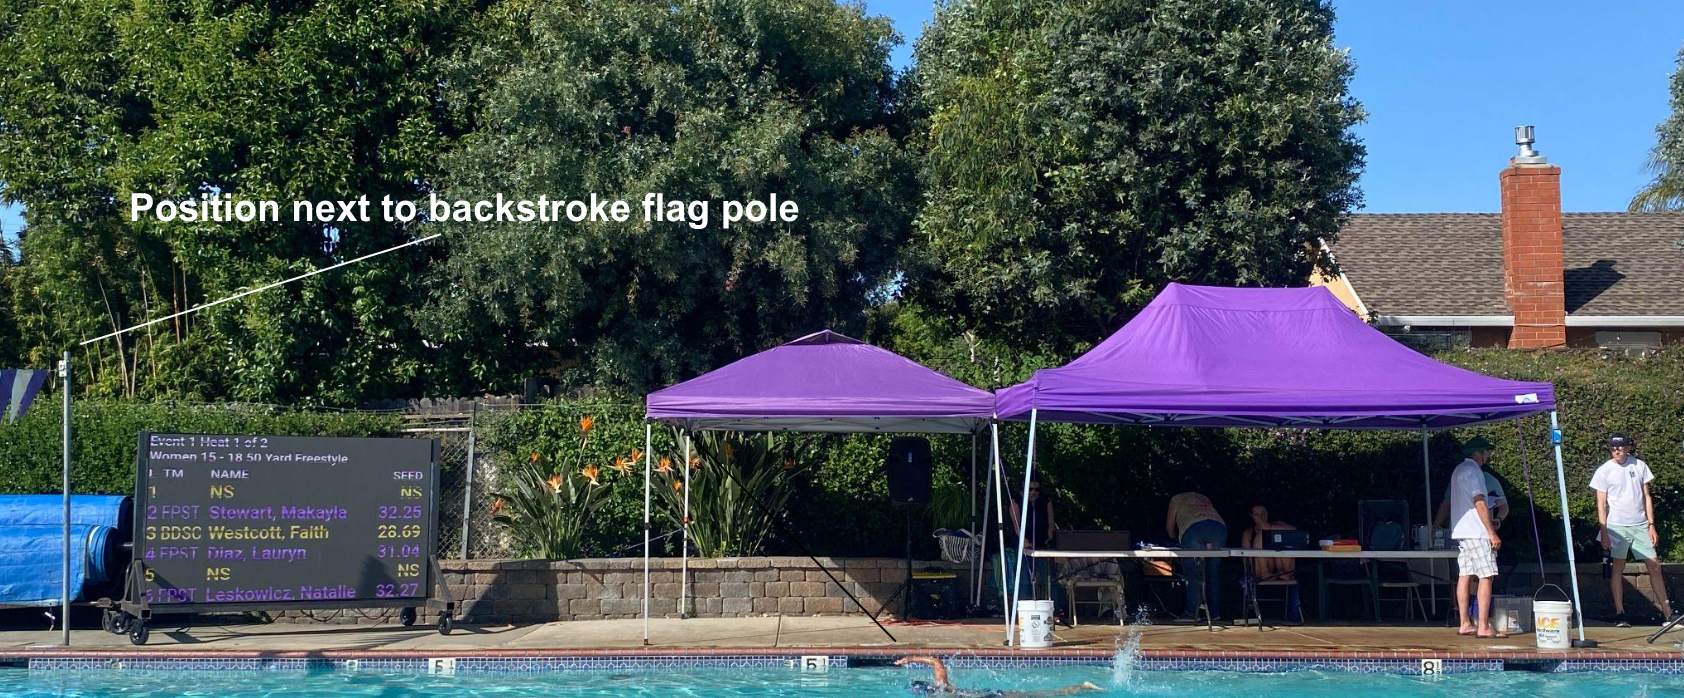
4. Set Up Backstroke Flags
Instructions: Pull out flags. There are numbers on one side of the flags. Numbers should face the blocks in the deep end and mark lanes 1 (closest to announcer) to 6. Flags may need to be adjusted so numbers line up properly over the lanes. Make sure they line up before securing with the lane rope ratchet strap.


Second Priority: Set Up Announcer and Timer Areas
1. Erect EZ Ups & Weights
Instructions: 2 Large EZ Ups for Announcer / Computer Desk, and 3 EZ Ups forTimers. Position 2 between Snack Shack & Diving Board, and 3 just behind starting blocks on deep end. For weights, fill buckets with water from the pool and secure to EZ ups with bungee cords.
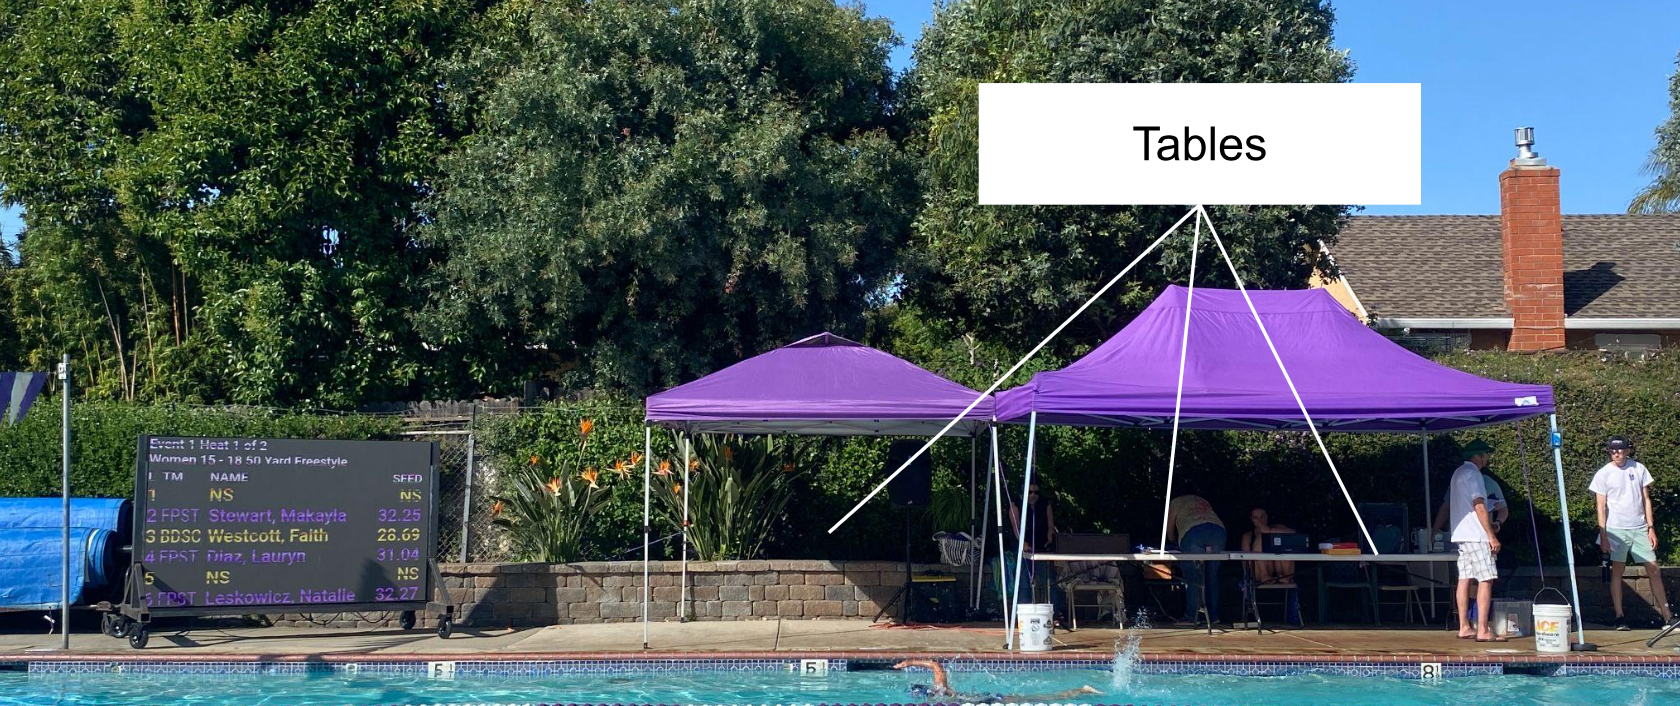
2. Set Up 3 Tables for Announcer/Computer Desk
Instructions: One under small tent and two under large tent. If only large tent used, only two tables need to be set up.
3. Bring out computer desk equipment
Instructions: Computer shields, Stroke & Turn Bin, Ribbon Box, Audio Equipment, Meet Box, Stopwatches, & Scoreboard Bin, and put them on the Computer Desk tables.
4. Set up chairs
Instructions: Set up 6 chairs (2 for each table) at Announcer / Computer Desk tables. Set up 18 chairs (3 per lane) behind the deep end starting blocks.
5. Block off Stroke & Turn Lane
Instructions: Grab one of the purple ropes and block the area from the backstroke flags to the shallow end of the pool. Lane should be 2-3’ wide.

6. Position & Plug In Scoreboard
Instructions: Have two people roll the Scoreboard out from the back shed to the north corner of the pool (by the snack shack). You will have to go around the shallow end. Plug the scoreboard into the outlet behind the snack shack and run along the brick wall.
Third Priority: Spectators & Sales
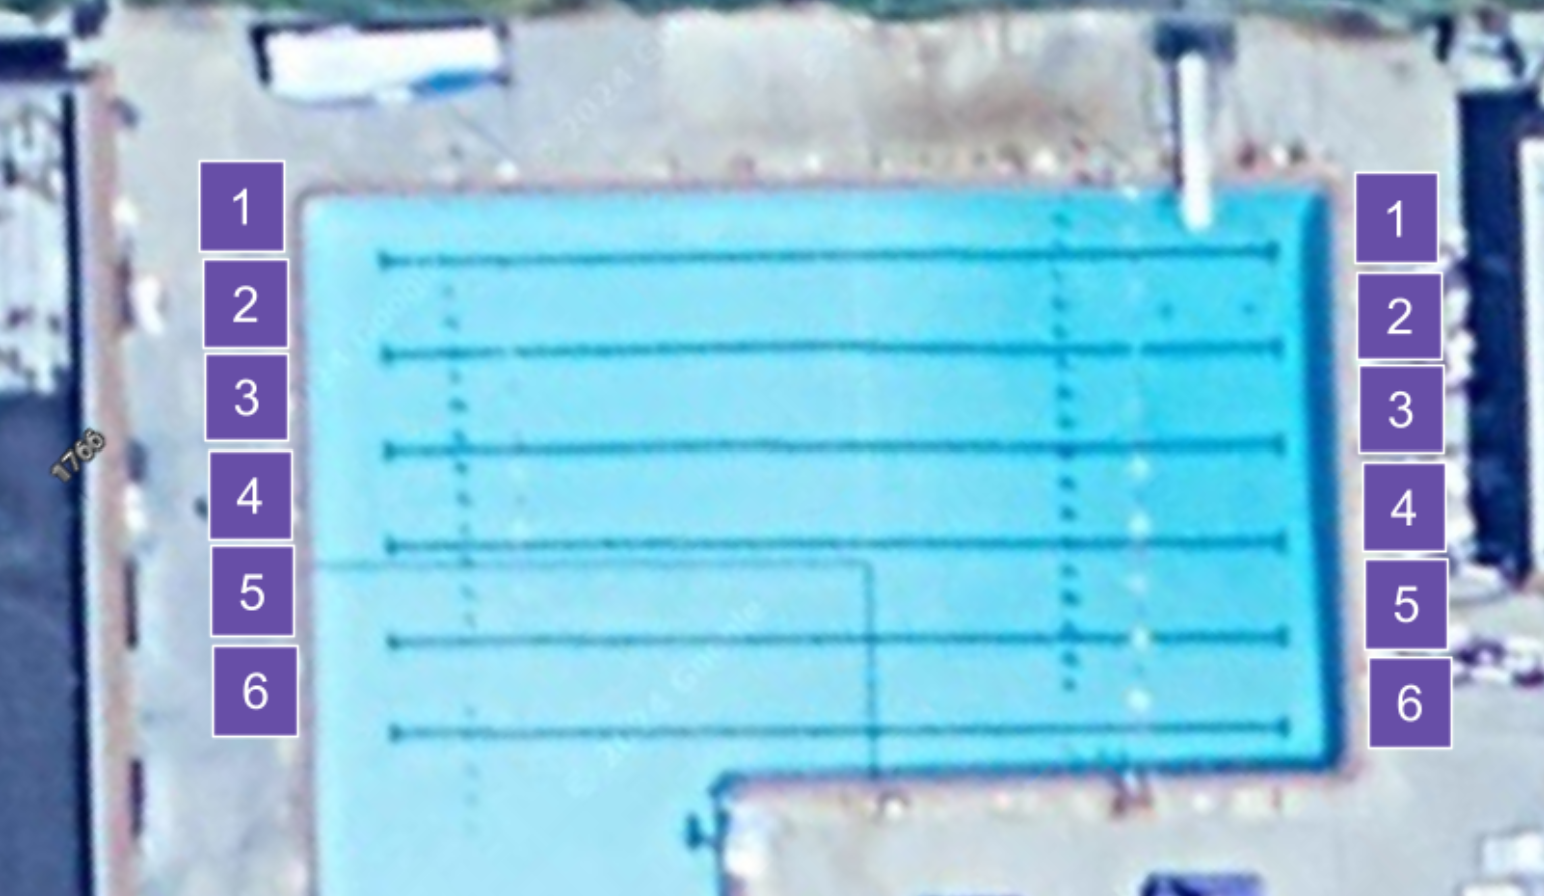
1. Position Bleachers
Instructions: Unlock bleachers (if locked) and place them on the pool deck according to the graph below. The back wheels should be on top of the wooden concrete spacer.

2. Block off Parking Spaces
Instructions: Place the Reserved sign just off sidewalk so entering cars can see it. Place cones and signs on each of the parking spaces. Front space is for raffle winner and the remaining spaces are for Coaches and Officials.

3. Set out Merch & Sales Tables
Instructions: Merch and Sales tables need to be positioned according to the graph below:

4. Move Front Tables
Take Down Procedure
Click Here
- Drop Diving Board
- Roll Lane Ropes onto Reel (pull onto deck on Wed. for AM Practice)
- Remove Starting Blocks: Shallow to Lifeguard Room & Deep End to Back Shed)
- Hang Backstroke Flags on hooks in Back Shed
- EZ Ups, Tables, Buckets, and Computer Desk Equipment to Back Shed
- Chairs to Chair Racks and in Back Shed
- Roll Scoreboard back into Back Shed.
- Store Bleachers behind Pool House
- Remove Cones from Parking Spaces & Return to Lifeguard Storage Area
- Clean Bathrooms
- Lock Back Shed, Snack Shack, & Swim Team Storage Area
- Empty / Replace all garbage bags & recycle can/bottle bags as needed
- Pick up trash & Lost /found items
PLEASE MAKE SURE ALL ITEMS ARE RETURNED TO THE PROPER LOCATION. BEFORE LEAVING, SETUP / TAKE DOWN LEAD SHOULD VALIDATE THAT ALL ITEMS ARE IN CORRECT POSITION AND ALL DOORS ARE LOCKED.
CABINET
TABLES


